Showing posts with label Beef - Nose to Tail Eating. Show all posts

Friday, 16 September 2016

Beef Jerky Making - Nose To Tail Eating

I have been meaning to post about this for a few months as we actually did this back in May and finally I am getting around to posting about it.

One of the great things about having lots of beef is that you can make things that you other wise wouldn't due to the cost.  We had out butcher put an entire Topside aside for Hubby to make Jerky or Biltong.  It weighed 9.5 kg which is a huge piece of meat to most people but you need to start with a lot as the meat shrinks as it dries out.  We borrowed a few books from the library and did some research online about making jerky but since it is not something I am a fan of and being pregnant am not allowed to eat it anyway I left it to Hubby to make what ever he wanted.

He decided on 3 different flavours made with a wet marinade, Mango, Orange and Kung Pow, which were all loaded with Trinidad Scorpion chillies.
After trimming and portioning out the meat the marinades were made and the meat was sealed in bags with each of the different marinades and left for 48 hours.


After 2 days of soaking the meat was dried in the oven on a low temperature.  I do own a dehydrator but was concerned that it I put the jerky through it would forever be tainted with chilli and pass that flavour on to everything I dehydrate in the future.


Hubby wanted his beef to be more like Biltong than Jerky meaning that the meat is not dried all the way through and is still a bit soft in the middle.


Once the meat had reached the desired moisture level Hubby sliced it and vacuum sealed it in portions.  We probably could have stored it like that at room temperature but we opted to keep it in the freezer just in case.


We took a whole lot of it away with us on our month long trip down south and there is still a little left but Hubby has been enjoying it as an after work snack and on weekends so I suspect it will soon all be gone.  He will now have to wait until we are in New Zealand to make more.

Do you make jerky or biltong?

Thursday, 15 September 2016

Final Soap Making Session

As we get closer to moving to New Zealand and out of our rental property we are in the process of using things up.  Because we will be moving in with family we are running down things like cleaning supplies and food.
We are able to take food with us when we move with in with family but we still don't want to overload them or leave them with things they will not use.
I still had a whole lot of tallow left (about 4 kg) in the freezer and because we cannot take tallow to NZ and we were not likely to use it up cooking (we do not use vegetable oil we use tallow instead) I used it all up making soap.
I posted back here the recipe I use which uses 1.5 kg of tallow to make the amount of soap shown in the photo below.  I made 2 batches that were pure tallow and as I did not have quite enough for a third batch I used 250 gm coconut oil and 250 gm olive oil to top up the 1 kg of tallow I had left.  To make sure I had my ratios right which is very important as different oils have different properties when it comes to making soap so I checked the ratios of each oil in this soap calculator.


I was also able to use up most of my essential oils making 1 batch with sandalwood, 1 batch with ylang ylang and 1 batch with patchouli.
As you can imagine that I now have a lot of soap curing but the good news is it will all be cured before the international movers come and pack everything so each batch will be packed into a shoe box and be sent off to NZ with our belongings.
It will probably keep us in soap for a long time to come but that is ok as we will not be rearing a cow for beef straight away and then once we do rear one it obviously needs more than a year to grow before we butcher it.
For us rendering the fat from an animal we have raised and butchered just makes sense as we pay for the entire weight of the animal including the fat so why just throw it away when we can save ourselves the cost of buying soap for the next few years and it uses up what would otherwise just be a waste product.
Tallow also makes a wonderful soap that is very gentle on your skin.  You should be able to get your local butcher to bag up fresh fat scraps for you that you can render down and turn into soap and even if you had to pay for it (some butchers might give it away) I am sure it would be really cheap.

My friend Liz recently posted about making tallow soap on the blog Lovely Greens so if you want a bit more info pop over and have a read.

What kind of soap do you make?

Wednesday, 9 March 2016

Braised Beef with Red Dates

This is a favourite recipe in our house and has never disappointing guests.  It is rich and tasty with lots of shitake mushrooms and Chinese red dates.
Chinese red dates are not related to common dates so if you cannot get hold of them then leave them out.  You can get them in most Asian grocers and they come dried, fresh and candied and may also be known as jujubes.


This dish is best made with a stewing cut of meat that has lots of connective tissue so that the meat is succulent and unctuous.  I used shin beef this time and it was amazing.


These are the dried Chinese red dates and you can see they are nothing like common dates.  They do have small seeds but they are not too hard (a bit like peppercorns but not as big) and I generally let people know to expect them so they do not get a fright.


The recipe uses Chili Bean sauce and I have included a picture so that you know what you are looking for.  It is a really tasty sauce and will add a hint of chilli and lots of flavour to any dish.  Some supermarkets sell it and Asian Grocers.


Traditionally the recipe uses yellow rock sugar but any sugar will do.


Braised Beef with Red Dates

2 Tbs Oil
1 kg Stewing Beef
4 Cloves of Garlic
4 Tbs Grated Ginger
2 Tbs Chilli Bean Sauce
2 Diced Tomatoes
3 Tbs Shaoxing Wine 
2 Tbs Yellow Rock Sugar (or other sugar)
2 Tbs Soy Sauce
1 Tbs Oyster Sauce
500 ml Beef stock or water
16 Chinese Red Dates
1 Packet of sliced dried shitake mushrooms

Crush your garlic, grate your ginger, dice your tomatoes and measure all the other ingredients into a bowl.  
Heat a heavy based pan to a medium high heat and dice your beef into large chunks.  Once the pan is hot add the oil and brown the meat in batches and set to the side.  Return all the meat to the pan once browned and then all of the other ingredients.  Bring to the boil then reduce to a low simmer and cook at a low simmer for 2 - 3 hours or until the meat is melting and tender.  When finished the dish is ready the sauce will be reduced and thick.
Serve with rice and steamed Asian greens.

Wednesday, 27 January 2016

Ox Tail Curry - Nose To Tail Eating

More than 12 months on we are still eating our way through our home raised and killed cow and there is still quite a bit to go.  It was all vacuum packed so it will last another year if we need it to.

Ox Tail is not something that appears on the average dinning table these days but it is something I remember eating as a kid, probably because like us back then my family raised our own meat.  
Oxtail is full of gelatin (so is extremely good for you) which cook out during a long slow cooking leaving a delicious, tender and unctuous (yes that is a word - my favorite word to describe food that is delicious, succulent, luscious, rich, decadent and has slightly oily mouth feel).

You can buy oxtail from most supermarkets where it is likely to already be cut into segments but if it comes from the butcher it might only be partially segmented like in the picture below, or they might only sell the bits from the thick end.  It is very easy to cut through as you can feel where the tail naturally segment.  Oxtail is not an expensive cut but since some of what you pay for is bone it is not the cheapest either but I think it is worth having every so often for all of the health benefits.


This is a Burmese style curry, that like a vindaloo contains vinegar, and is really very easy as it is a one pot wonder when it comes to the cooking.  Marinate the meat for at least 3 hours, I like to do this bit at breakfast and it takes 3 hours to cook so don't forget to get it on at afternoon tea time.

Ox Tail Curry

2 whole oxtails or 1.2 kg approx (cut into 4- 6 cm pieces)
2 1/2 Tsp Mustard Powder
3 Tsp Ground Cumin
1/2 Tsp Ground Turmeric
125 ml White Vinegar
1 Tbs Castor Sugar
2 Tbs oil, tallow or lard (I use beef tallow as we have lots of it)
3 Large Onions diced
6 Cloves of crushed garlic
2 Tbs Grated Fresh Ginger
2 tsp Chilli Powder
1 Litre of Beef Stock

Mix together the mustard powder, cumin, turmeric and vinegar add the oxtail and toss to coat then set aside in the fridge to marinate.
In a large heavy based pot heat the oil/tallow over a medium heat and add your diced onions and cook stirring regularly until they are soft and translucent but not browned too much and then add the ginger and chilli powder and stir for 1 minute before removing the onion mix from the pan and place in a bowl.  Add your crushed garlic to the hot onions and leave to the side.
Place the oxtail into the pot and brown the pieces all over saving the marinade.
Once the oxtail is browned add left over marinade and bring to a simmer for 3-5 minutes or until the liquid is reduced by half.
Then add all of the onion mix back into the pot along with the beef stock cover and cook for 3 hours at a gentle simmer.
Remove the lid and cook over a high heat for 15 minutes or until the liquid has reduced by 1/3.
Serve with plain rice and a garnish of fresh chilli if you like it hot.


What unusual cuts do you like to eat?
Do you like ox tail?

Saturday, 5 September 2015

Beef Madras

This is a lovely mild curry and if you can get fresh coconut it is even better but I like to use the moist coconut flakes soaked in water.
I use blade steak for this recipe but any cut of stewing steak will be good.  It needs to be a cut that has a bit of fat and connective tissue so that when it is cooked low and slow they melt and keep the meat soft and juicy.


Blade steak comes from the top of the shoulder of a cow.  It is a muscle that does a lot of work and has a lot of connective tissues and collagen that melt out during cooking but it needs to be cooked long and slow to ensure the meat ends up tender.  


A whole blade


The blade sliced so you can see the connective tissue through the muscle.


Beef Madras

1 Cup of Grated Coconut
400 gm Dice tomatoes (tinned or fresh)
4 Tbs Fresh Ginger finely Diced
2 Tsp Blacked Mustard Seeds
2 Tbs Tamarind Concentrate
2 x 2 Tbs Oil
2 Large Onions, sliced
6 Cloves of Garlic, crushed
1 Tbs Ground Cumin
1 Tsp Ground Turmeric
2 Tsp Ground Coriander
1 Tsp Chilli Powder
2 Tsp Sweet Paprika
10 Curry Leaves
1 Kg of Chuck Steak
1/2 Cup of Water
3 Tsp Salt
2 Tsp Sugar

If you are using dried/semi dried coconut soak it in 1 cup of boiling water for 1 hour then blend it (including the water) in the food processor with the tomatoes, ginger, mustard seeds and tamarind until it is a puree.
Heat the first measure of oil in a heavy based pan and brown the meat in batches removing after each batch.  Once all the meat is browned add the second measure of oil and cook the onion and a pinch of salt over a medium heat stirring regularly until the onion is soft and lightly browned.  Add the garlic and stir for 1 minute before adding all of the spices and stir for a further minute before adding the coconut mixture, curry leaves, beef and water.  Cover and simmer for 1.5 - 2 hours or until beef is tender.

Tuesday, 7 July 2015

Using Up Left Over Roast

With our freezers full of beef we have quite a few different types of roasts including topside, rolled brisket, blade and rump.  Regardless of what type of roast you cook you are often left with a few bits and pieces that are not really a tasty appealing looking meal in themselves, a bit of over cooked meat, some gravy and a few odd veggies.   So what do you do with these roast odds and ends?


I think the best ways to use up these odds and ends is to make a pie filling.  To do this  I dice and remaining meat and veggies and set aside then I take the left over gravy and re-heat it in a saucepan. If there is not a lot of gravy I add some beef stock to the pot and then more cornflour to thicken it, Finally I add in all of the chopped up meat and veggies often some frozen peas and herbs like parsley and thyme.  I stir it all together and either use it straight away or freeze for later use.
You then have the option of making a pie at the drop of a hat topped with pastry, mashed potato/sweet potato/pumpkin, a crumble topping (try this one it is really tasty) or even dumplings.

This can be applied to any type of roast and is a really frugal meal option.

How do you use up left over bits from a roast?

Wednesday, 27 May 2015

Penang Beef And Coconut Curry With Peppercorns

We love curry and it does not matter what part of the world it comes from.  This is a Thai curry and it is not hot at all in fact in this dish the heat comes from the pepper not chilli although you can always add chilli on top like we do it you like a bit more heat.
You can use any cheap cut of beef for this dish and because it is cooked for a long time it will be amazingly tender.  It is important that you do not shake the coconut cream as you want to separate the cream from the milk.


Penang Beef And Coconut Curry With Peppercorns

1 x 400 ml Tin of Coconut Cream
500 g Diced Beef Shin/Blade/Chuck or other stewing cut
2 Tbs Red Curry Paste
2 Tbs Palm Sugar or raw sugar
1 Tbs Fish Sauce
1 x 55 g Tin of Green Peppercorns in Brine, drained and rinsed
8 Kafir Lime Leaves
4 Tbs Roasted Salted Peanuts, chopped
1/2 Cup Basil Leaves
1 Long Red Chilli (Optional)

Open the cocnut cream and spoon out the thick cream from the top and set aside in a bowl.  Pour the remaining coconut milk into a large saucepan and add your diced beef and a little water to cover if required.  Bring to the boil then reduce to a simmer and cook for 2 hours or until the beef is tender.
Allow the beef to then cool in the liquid.  

When the beef is cooked and cooled heat the remaining coconut cream in a wok over a medium heat until the oil starts to separate.  Add the curry paste and fry gently for 5 minutes the add the sugar fish sauce, half the peanuts, the kaffir lime leaves and beef.  Then add enough of the beef cooking liquid to make a thick sauce.
Simmer on a low heat for 10 minutes stirring every so often and then add the peppercorns, basil and finely sliced chilli.  As soon as the basil is wilted remove from the heat and serve over fluffy rice and garnish with the remaining peanuts.

This is a really easy curry to make and the pepper is a great change to the normal chilli heat that curries often have.

Monday, 18 May 2015

Beef Spare Ribs

Weekends are a great time to enjoy Beef Spare Ribs as they need long slow cooking to make sure they are melt in your mouth sticky goodness.  I start mine on Friday or Saturday night when I am getting dinner ready and they are ready for the next day.

It is pretty common to find pork ribs for sale but if you want to do beef ribs you will have to ask your butcher for them.  We are using beef ribs because that is what we have and it is one of the more unusual cuts we asked our butcher for when working out all the different cuts.

Beef ribs like pork ribs come with layers of meat sandwiched between layers of fat and when cooked slowly the fat renders out of the meat and melts basting the meat in flavour.  The can still have a bit of fat when done but the meat will be so tender that any left over fat will fall away from the meat.


I make a spice rub for my ribs consisting of 1tbs Crushed fennel seeds, 2 tsp smoked paprika,
1 tsp dried thyme, 1 tbs brown sugar, 1/2 tsp salt and 1/2 tsp pepper, 2 cloves of crushed garlic and the zest of an orange.  Mix all together and rub into the ribs then chill in the fridge for at least 4 hours but over night is better.


On the day of baking heat your oven to 150 degrees and cook the ribs bone side down in a covered baking dish for 2 hours.  Then add 2 cups of apple or orange juice to the dish and cover again making sure the dish is well sealed and steam cannot escape.  Return to the oven for another 2 hours.

Once this time is up I remove from the oven and pour off all the liquid and put the ribs back in the oven uncovered to let them dry out for 15 minutes.  After that I use my home made BBQ sauce and brush it all over the ribs returning to the oven for 30 minutes brushing all over again with the BBQ sauce and giving them a final 15 minutes.

The ribs will now tender and sticky all at the same time and finger licking good.

Do you eat ribs?  Do you have a preferred method of cooking them?

Thursday, 14 May 2015

Fat For Flavour

I am in my mid 30's and when I was a child my mum always kept a enamel mug of fat in the fridge that she used for cooking.  It was generally fat that had been drained off a roast and it was then used for other cooking.  I remember having bread fried in this fat as a treat some Sunday nights alongside grilled tomato, bacon or sausages and eggs.

While I have not eaten fried bread since then I do still use animal fat for cooking.  When we had our cow killed I requested all of the fat to be mince which I then rendered down.  I used some of the fat for soap making and I have a container in the freezer that I can use for cooking.  Because it has a slightly beefy flavor I do not use it with poultry (I save duck fat and chicken fat for this), fish or sweets but I use it instead of vegetable oil for other meats and strongly flavoured vegetable dishes.


When ever I am cooking something and there is a bit of fat left over or floating on the surface I strain it off and store it in the freezer in plastic containers.

If I cook duck I save the duck fat for cooking roast veggies or poultry. If I cook roast lamb I save the garlic and rosemary infused fat for cooking veggies or croutons and if there is lots of fat on the top of a curry I save it and use it as the oil when I make my next curry (we eat a lot of curry).

Labeling your fat ensures you use it in an appropriate future dish.

All the flavour from the previous curry are passed on to the next one.
By using the fat this way you add a whole extra layer of flavour to the next meal and you will not be spending money on vegetable oils or using them for the majority of your cooking which may not be good for your health.  

To read more about the health implications of vegetable oils you should check out David Gillespis book 'Toxic Oil' and you can check out his interview on the ABC here or read Liz's review of the book here.

Do you save and reuse oil?
What oils do you cook with?


Monday, 11 May 2015

Easy Beef Wontons

With all the mince we have (36 kilos) from our cow  I am focused on all the different ways to use it to make frugal, tasty and interesting meals.

Wontons might seem like something that are complicated and not made in many non Asian households and while they are a little time consuming to make the are actually really easy and sooo tasty.  
This recipe can be made using any type of mince and I have used chicken and pork in the past but now that we have so much beef we are using what we have.

When we make these we do it together as it makes the job much quicker.  We share in prepping the mix and then we fill the wontons.  I love that we do these together and has been really good for Hubby to learn how to make them.

Beef Wontons  Makes 80

700 gm Beef Mince
4 Spring Onions Finely Sliced
Thumb Sized Piece of Ginger Peeled and Grated
Small Tin of Water Chestnuts Finely Diced
2 Tbs Soy Sauce
2 Tbs Sesame Oil
1 Tbs Shaoxing Chinese Cooking Wine (Optional)
2 Tbs Corn Flour
2 Packets of Wonton Wrappers

Mix all ingredients using you hands to make sure the mix is well combined and then use a teaspoon to fill the wrappers.


This is my method and may not be the traditional method of filling them but it is easy to do.
Before you start filling the wrapper set your self up with a small bowl of water and a tray to lay your wontons out on.

Peel off a wonton wrapper and lay on the palm of your hand.  Then take a teaspoon of mince mix and place it in the center of the wrapper.


Dip a couple of fingers in your bowl of water and wet 2 edges of the wonton wrapper.  Then fold the wrapper over to form a triangle shape pressing from the filling out on each side so you are not trapping air in the wonton and you are then pressing the outer edges together to seal.


Dampen your fingers again and moisten the triangle tips then fold them in to the center to form an envelope shape.


If you have any mix left over you can fry it as part of a stir fry steam them of freeze it for later.

I lay them all out on trays and freeze them.  Once frozen I transfer them to freezer bags and put them back in the freezer.
They make such a quick and easy meal and cook in 13 minutes from frozen and 8 minutes from fresh in boiling water.
Or you can add them to Asian broths and make a great soup.

Have/do you made/make wontons?

What is your method for folding?


Wednesday, 6 May 2015

Home Made Beef Stock - Why you should bother

Do you make your own stock?  

If you don't then I highly recommend you give it a go because it is really easy and a well made stock is highly nutritious and will contain the minerals from the bones, cartilage, marrow in a form that easy for your body to absorb and use.

When we had our cow killed we asked the butcher to provide us with all the bones for us and our dog Jessie as we want to use as much of her as possible.  I specifically asked for some meaty bones for stock making and I am sure you could ask any butcher to do this for you.

I make mine with the addition of some vinegar which when added during the cooking process helps the bones release minerals such as calcium, magnesium and potassium into the stock.
Gelatine when taken with food aids digestion as it is hydrophilic (it attracts liquid to it) allowing it to attract digestive juices to the food particles.

'Jewish Penicillin' (chicken broth) and fish head broth are both traditional foods and have been around for hundreds of years.

Stock can be used to inject flavour and nutrition into meals and has long been used in fine dining restaurants where the stock is infused with herbs/wine and reduced down to create delicious sauces.

The way to test if your stock contains good amounts of gelatin is to chill it.  Your stock should thicken if not turn completely to jelly.

I find it is easiest to make really big batches (between 5-8 litres) and freeze the stock in portions in the freezer so that I can add it to meals, use it as the base for soups.  This is my method for making beef stock and I do my chicken stock the same (unless I am making a clear Asian chicken stock which is done at a lower temperature and not allowed to boil).

Beef Stock

2 kg Meaty Beef Bones
4 Carrots
6 stalks of Celery
4 Onions
A Bunch of Parsley
1/4 Cup Apple Cider Vinegar
Water


Place all the bones in a large roasting tray and place into a 180 degree oven and roast until the
bones are really really dark but not burnt.


Add carrots chopped into thirds (I used up old carrots that were in the fridge and were a bit past their best, they had a few spots on them so I peeled them) chopped celery, onions (which I do not even peel I just wash them) parsley and vinegar.


Cover with water (I use about 8 litres), bring to the boil then reduce to a simmer and cook for at least 5 hours in a covered pot.


Once the stock is cooked and cooled I strain off the sock into large containers and chill in the fridge overnight.  I then give all of the meat, bones and veg left in the pot to the chickens.  And if you have never fed your chickens meat let me tell you they go crazy for it.  They also peck at the bones and in a couple of days you can go out and pick up the bones that have now been picked clean.

The next day the stock has set to a firm jelly with a thin layer of fat on the top.  I then use a sponn to remove the fat. 


Once the fat has been removed I measure the stock into takeaway containers and label them the they all go in the freezer.
By having the measures on the lid it makes it really easy to use ant the containers stack really well so they are space savers.


Do you have any tips for making a good stock?  What veggies do you use?

Thursday, 30 April 2015

Oyster Blade Steak - A Versatile Cut

As part of my series on nose to tail eating I am sharing with you some of the different cuts of meat we have from the whole cow we had butchered and ideas for using them.

Oyster Blade steak comes from the shoulder bone of the cow and has a thin line of gristle running through the middle.  It is a juicy and full of flavour cut which has a variety of uses.

It is often used as a stewing meat which allows the gristle to break down during the long slow cooking and on the other hand it works great in a stir-fry when cooked really quickly.  It also makes a very tasty steak but you need to either score the gristle to prevent it curling or trim the steak into two long strips but cutting along each side of the gristle.
The other way I have used it is to trim the gristle out of the middle and then slice it as thin as I can.  I then add it raw to a bowl of cooked rice noodles, bean sprouts and Asian herbs then top with a hot beef broth which cooks the thin slices of stakes and creates a delicious soup.


The oyster blade is a fairly cheap cut of meat that has a variety of uses and is really tasty so speak to your local butcher about getting some.

Tuesday, 31 March 2015

Devilled Sausages

This is such a tasty and frugal meal and one that I love.  In the past I used to use one of those packet mixes but then I started making this version and I will never go back as the flavour of this is so much better and it is really no more effort.

With so many sausages to use up from our cow I will be trying to come up with some interesting uses for them.
This is one of those meals that uses just a few basic ingredients and will be enjoyed by all the family.


Devilled Sausages

10 - 12 Sausages
1 Large Brown Onion, thickly diced
2 Granny Smith Apples, thinly sliced
1 Tsp Mustard Powder
2 Cups of Beef Stock
1/2 tsp Celery Salt
1/4 Cup Brown Sugar
2 Tbs Soya Sauce
1/2 Cup Tomato Sauce

Brown the sausages on all sides and then set aside.  In the oil from the sausages cook the diced onion for 5 minutes over a medium heat then add the apple and cook for a further 5 minutes stiring often to ensure the apple does not burn,  Add the remaining ingredients and stir until combine then add the sausages back in and cook on a low - medium heat uncovered for 30 minutes or until the sauce has reduced.

Serve with Mash and vegetables.

Thursday, 19 March 2015

Beef And Lentil Curry

I found this recipe in an old magazine and decided to give it a go.  The magazine did not specify the country of origin but I suspect it is from the India, Myanmar or northern Thailand region.

This curry has a sauce added at the end which gives it a real tangy punch.

The recipe calls for Chuck steak which comes from the shoulder and is ideal for curry's as it contains lots of connective tissues and collagen which partially melt during cooking and make the meat tender and succulent.  You can use any cut of stewing steak for this recipe.


Beef and Lentil Curry

Dressing

5 Long Red Chillies
1/2 Cup White Vinegar
1/4 Cup Lemon Juice
1/4 Cup Fish Sauce

Combine all ingredients in a bowl and set aside until serving.

Curry

1/4 Cup Vegetable Oil
2 Onions
8 cm Piece of Ginger peeled and grated
8 cm Piece of Galangal peeled and grated
2 Cloves of Garlic crushed
2 Birdseye Chillies deseeded and finely chopped
3 Lemongrass Stems, Bruised *See Note
10 Kaffir Lime Leaves
1/2 Cup Grated Palm Sugar
2 Tbs Ground Turmeric
2 Tbs Ground Coriander
2 Tbs Ground Cumin
2 Tbs Sweet Paprika
1 Pinch of Cayenne Pepper
1 kg of Chuck Steak
1/2 Cup Fish Sauce
2 Cups Red Lentils
1 Cup of Toasted Desicated Coconut 
2 Cups of Coconut Milk
Fresh Coriander and Basil to serve

Get the curry on the go and then when it is cooking you can make the sauce.

Heat the oil in a large pan over a medium heat and cook the diced onion until lightly browned.  Add the ginger, galangal, garlic birds eye chilli, lemongrass and lime leaves and stir for 2 minutes then add the dried spices and cook for another 2 minutes stirring the whole time before adding 4 cups of water, the beef, fish sauce.  Bring the sauce to a boil and  the reduce to a simmer and cook for 2 hours stirring occasionally.
After 2 hours add the lentils and coconut and cook for 30 minutes or until the lentils are soft.  Once the lentils are cooked stir in the coconut milk bring it bake to the boil then remove from the heat.

Spoon into serving bowls or over rice and top with fresh herbs and chilli dressing.

Note: Using Lemon Grass

If you have not used lemongrass before you need to trim off the base and the green tops so you have about a 15 cm stalk.  You then need to discard a number of the outer layers until you are left with the fresh pale inner stalk.  In this recipe you just bruise the stalks (I whacked mine with the pestle from my mortar and pestle on the chopping board) and add them whole to the pan but other recipes will call for you to slice the lemon grass finely.  You can watch a demo here.

Wednesday, 18 March 2015

Beef Chilli

This is such a great dish and be used for many different meals including Chilli Con Carne, Nachos, Tacos, Chilli Beef Pie, Mexican Lasagna, Baked Potatoes Topping, Enchiladas and many more.

You can make this recipe with mince but my favourite cut of meat to use is Beef Brisket.  The Brisket comes from the lower part of the chest and needs to be cooked on a lower heat and for a longer period of time and has a wonderful flavour and texture.

If you get a whole brisket from your butcher you can ask them to trim it for you or you can take it home and trim off any silver skin which will become tough when cooked.  You Also need to slice across the grain of the meat or you will end up with stringy bits of beef.

This recipe also uses Dried Chillis which you can get from international food stores or online and it is worth the effort.  For this recipe I would suggest Ancho, Poblano or Chipotle Chillies as these have a great flavour without being too hot.  If you can't get hold of these you can add some extra smoky paprika, some cayenne pepper or leave it out altogether.  I would not suggest using dried Asian chillies as these tend to be quite hot.


Beef Chilli

2kg Beef Brisket sliced into 2.5 cm  pieces (or use beef mince)
500ml hot coffee (or beef stock if you are sensitive to caffeine)
3 Large Dried Chillies
2 Heaped Teaspoons Ground Cumin
2 Heaped Teaspoons Smoked Paprika
1 Heaped Teaspoon Dried Oregano
2 Fresh Bay Leaves (or 4 Dried)
2 Red Onions
3-4 Fresh Long Chillies
2 Cinnamon Sticks
10 Cloves of Garlic
2 x 400 gm Tins of Diced Tomatoes or fresh equivalent
3 Tablespoons of Molasses or Dark Brown Sugar
3 Red, Yellow or Orange Capsicums
2 x 400 Gm Tins of Kidney Beans or or equivalent

Make the coffee and soak the dried chillies in it to let them re hydrate.  Meanwhile put a large casserole pan on a low heat on the stove top and add some oil (I used beef tallow) the cumin,paprika, oregano, bay leaves and diced onion and fry for 10 minutes stirring often or until the onion is soft.
De-seed and chop the fresh chillies, chop the re hydrated diced chillies and add them to the pan along with the cinnamon sticks, garlic, and a splash of the coffee.  Then add the rest of the coffee, some salt and pepper, the tomatoes, molasses and the beef.
Cover and simmer for 3 hours stirring occasionally.  After a few hours use a couple of forks to break up the meat and pull it apart.  Then add the diced capsicum and beans and simmer for an additional 30 minutes.  Taste for seasoning and add additional salt and pepper as required.

Serve with rice, salad, tortillas or as part of one of the suggestions above.

This makes a big serve but it freezes well and is great to have on hand for a quick and easy meal.


Thursday, 5 March 2015

Roasted Rib On The Bone - Nose To Tail Eating

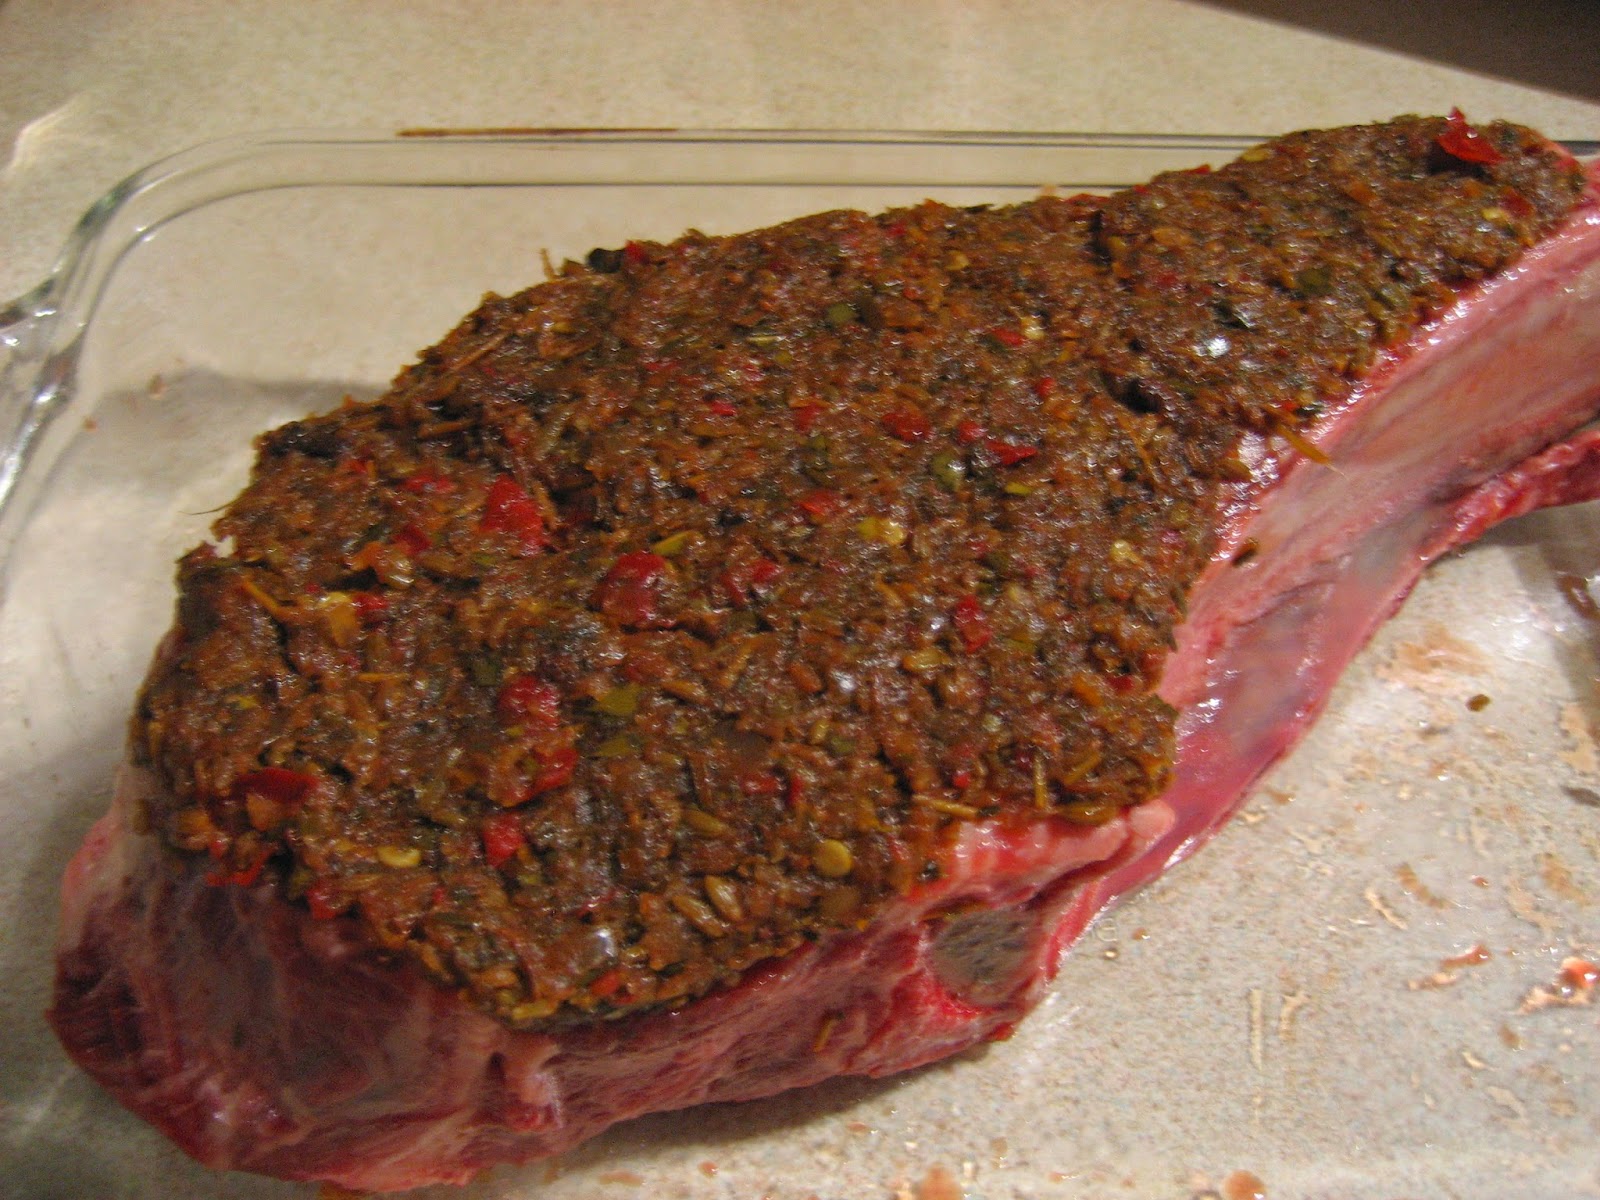
Recently I made another batch of BBQ sauce.  When you make the sauce you strain out all of the herbs and ground spices so that you are left with a lovely silky sauce.  I did not want to waste all those lovely flavours so I used them to marinade a piece of beef.

When I asked for our cow to be cut into all the different cuts I asked for some thick cuts (ours were about 5cm thick) of rib fillet on the bone as I wanted to use them for roasting.
The Rib Fillet on the bone is also know as an OP Rib and consists of a rib fillet steak still attached to the rib bone as the name suggests.
This cut has enough fat to keep it juicy when roasted and the fact that the meat is still on the bone means you get additional flavour from the bone.


So I covered both sides of the meat with a layer of the spice paste covered it an left it in the fridge for 24 hours.


Before cooking I removed most of the spice paste knowing that the flavours would have penetrated the meat.  I was not wrong.
It was juicy and tender and had all the different flavours from the spices in the paste.  It was a great size for the two of us to have dinner that night and left overs for lunch the next day.

I encourage you all to talk to your butcher about different cuts of beef that you might not normally buy and try something new.  You never know you might find a new favourite.

Tuesday, 24 February 2015

Rendering Beef Fat and Soap Making

The other day I posted nose to tail eating, and making the most of all the different cuts of meat that come from an animal. 

One of the thinks I asked the butcher to do was to save all of the fat and mince it for me.  He wanted to know what I was going to do with it as no one has ever asked him to do that before.  I told him I planned to use some for soap making and also for cooking.  
Mum said that she didn't think she could be bothered to render the fat for use and to make soap but it really wasn't that much effort at all.  Plus we were paying for it and we already had the other ingredients for making soap so it will save us money by not having to buy soap in the long term.

These days most people buy vegetable oils for cooking but historically animal fats were commonly used for cooking.  And when I say historically I am not talking even 50 years ago.  As a child (I am in my 30's) I grew up on a farm and I remember my mum pouring the fat off the roast each week into an enamel mug which lived in the fridge.  This fat was later used to cook other dishes.  The fat carried forward the flavours of each dish into the next.

All of the fat from our cow was minced and bagged up and it spent a few days in the freezer before we had time to process it.


Bags of frozen minced fat

The process of rendering is really very simple when you have a slow cooker.
You just fill your slow cooker to the top with the solid fat, set it on low and wait. I have seen instructions to add water but I don't bother.


Frozen fat into the slow cooker

As the fat renders the volume will drop so you can keep adding more fat as there is more space.


The fat is beginning to render

As the fat melts all of the meat bits will get cooked as well.  You are going to need to strain all the meat bits out at the end so if you can skim some off the top as you go this will speed up the process.


Meaty bits floating to the top

After straining all of the meat bits out of the fat I was left with a clear yellow oil which I divided into plastic containers. 
And what to do with all those meaty bits?  We didn't want to waste them so fed them to the chickens and they loved them.


The rendered fat ready for chilling

Once the fat cooled and set it changed to a pale cream colour.  Well made tallow can be stored at room temperature without spoiling but in our hot Queensland summer I was not willing to take the risk so I have been storing them in the freezer.  It doesn't freeze but it is easier to have it in there so we can use the fridge for fresh food.


With so much tallow the plan had always been to use most of it for making soap but I wanted to see how tallow one batch of soap would actually use up.

The ratios I used are:

1.5kg Beef Tallow
198g Caustic Soda
450ml Water
Essentail Oil 
Processed at 55 degrees centigrade with the essential oil added once trace was achieved.

I will not give any instructions about the process of making soap here as there are other blogs and websites that explain the process in enough detail to make it safe.  
I like to pour my soap into silicone molds as it is so easy to get them out.  You just peel the molds away, cut the larger block into portions and leave the soap to cure.


I ended up with 24 bars of soap and these are now curing.  They smell divine and I might have over done it with the essential oil but the last batch I made had no fragrance that was noticeable to this time I was a bit more generous.
I used a blended fragrance called Romance blend which I have had sitting around for years and it really need to be used up.  It is a blend of Cinnamon, Clary Sage, Patchouli, Sandalwood and Ylang Ylang.

Once it has cured and I have given it a bit of a test I will be giving some away so stay tuned.

What kind of soap do you make?